

You’re here because you’ve seen this message.
We feel your pain - connecting an online store to Instagram and enabling product tagging has turned out to be a major hurdle for many Shopify retailers.
This is why we decided to dig deeper into the issue and provide you with a solution.
How to enable Instagram Product Tagging?
Instagram product tagging works only if your Instagram account has already been approved for Shopping on Instagram. All Shopify store owners must meet the following requirements in order to be eligible for Shopping on Instagram:
1. Be on the Basic Shopify plan or higher.
2. Comply with Facebook and Instagram’s merchant agreement and commerce policies.
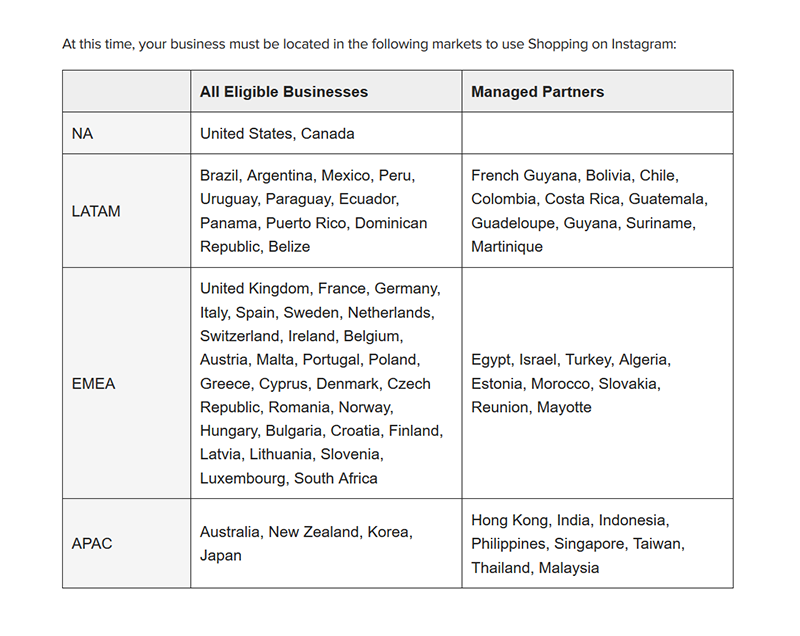
3. Run a business that is located in a supported market.
4. Sell physical products.
Currently, Instagram product tagging is available only to businesses that offer physical goods. Services and digital products are not accepted.
5. Have the latest version of the Instagram app (that is available in your country).
Otherwise, you won’t be able to enable Instagram business settings later on (after you’ve been approved for Shopping on Instagram). Check Step 9 for more information.
6. Have an Instagram business profile.
To convert a personal Instagram account into an Instagram business profile:- Go to your profile and tap the 'Menu' button in the top right corner
- Go to 'Settings'
- Go to 'Account'
- Tap 'Switch to Business Profile'. If you don’t see this option, check if your personal account is set to public. Private accounts cannot be switched to business accounts.
- You will be redirected to a 'Setup your Business Profile' page. Fill in the required information about your business (niche, contact information, etc.).
- Tap 'Done'
With an Instagram business profile, you will also be able to use Instagram business features and have access to Instagram Insights (likes, impressions, reach, outbound links, and more).
7. Connect your Instagram business profile to a Facebook business page.
Currently, you can connect your Instagram business profile to only one Facebook page.
- You must be the admin of that Facebook page.
- Your Facebook page must not have any age or country restrictions. Instagram does not support such restrictions.
- Your Facebook page must have an approved Facebook Shop section (otherwise Instagram product tagging won’t work).
- Your Facebook Shop must not offer a ‘Message to Buy’ checkout.

Facebook offers two check-out options: ‘Message to Buy’ and ‘Check Out on Another Website’.
Instagram does not support the ‘Message to Buy’ checkout method, i.e. your Facebook Shop must offer the ‘Check Out on Another Website’ checkout option.
If you have already created a Facebook Shop with a ‘Message to Buy’ checkout option, you must delete the shop section, recreate it and select the ‘Check Out on Another Website’ checkout method.
8. Connect your Instagram business profile to a Facebook catalog.

Source: Shopify
Your Facebook page must be the owner of your Facebook catalog.
If you connect your Shopify store to the Facebook Sales Channel, a Facebook catalog will be automatically created.
However, Shopify will be its owner, not you. If this is the case, you should delete your Facebook catalog, manually create a new one and assign your Facebook page as its owner/admin.
Here’s how to create an empty Facebook catalog:
- Create a Facebook Business Manager account
- Go to ‘Business Settings’ → ‘Data sources’ → ‘Catalogs’

- Click on the ‘+ Add’ button and select ‘Create a New Catalog’

- Choose a name for your catalog and select a catalog type (for example, ‘Products’)
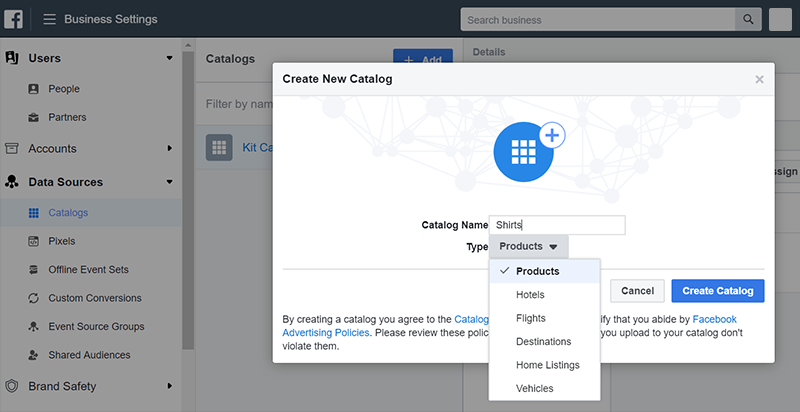
- Click on ‘Create catalog’
-
Use Data Feeds. In this case, you will have to upload a data feed that contains product information. You can control which products are added to your Facebook catalog and when.
You can upload your data feed once or set a schedule for automatic uploads. The first option is recommended if your product feed (i.e. inventory) doesn’t change often. The second option is recommended if there are regular changes to your inventory.
Using data feeds is a viable option if your Shopify product catalog contains more than 50 products, or if you run dynamic Facebook ads. - Add Manually. This is a viable option only if your product catalog contains less than 50 products, or if you’re just getting started with Facebook catalogs.
Basically, the solution exports products from your Shopify store and imports them in your Facebook catalog.
Note that if the schema of the Shopify export file is different from the one required by Facebook, you will need to make the necessary changes.
Once you’ve added products to your Facebook catalog, it is essential to make sure that it is properly associated with your Instagram business account through your Facebook page. Here’s how to do this:
- Open Facebook Business Manager
- Go to ‘Business Settings’
- Go to ‘Accounts’. Ensure that your Facebook business page is connected under ‘Pages’ and that your Instagram business account is connected under ‘Instagram accounts'.
- Go to ‘Data Sources’. Ensure that your Facebook catalog is connected under ‘Catalogs’.
Once you complete Steps 1 to 8, Instagram will review your business account to check whether you’re eligible for Instagram Shopping.
The approval process should take a couple of days. However, a lot of retailers are complaining that they have been waiting for months. What is even more confusing is that Instagram doesn’t send any notifications during this process. Therefore, if you’ve been in the dark for a long time, we advise you to contact Instagram or Facebook for support.
If you have completed Steps 1 to 8 correctly, your account should be approved for Shopping on Instagram and you will receive a notification on your Instagram business profile.
When this happens you can proceed to Step 9.
9. Enable business settings for Shopping on Instagram
- Go to your Instagram business profile
- Tap the ‘Menu’ button in the top right corner
- Tap ‘Settings’ → ‘Business’ → ‘Shopping’ (Note: The ‘Shopping’ option is available only to accounts that have already been approved for Shopping on Instagram.)
- Tap ‘Continue’
- Select the Facebook catalog you want to connect to your Instagram business profile
- Tap ‘Done’
10. Bonus step: How to tag products on Instagram?
- Select a photo you want to tag a product in
- Tap the product in the photo
- Type the name of the product in the search box on the right
- Select the product you want to tag in the photo
- Tap ‘Done’
- Tap ‘Share’
Et voila! You have a product tag!
Product tags contain only the basic information about a product - product name and pricing.
When somebody taps on the product tag, they will be redirected to a more detailed Instagram product page that contains a product photo, a product description, and a ‘View on website’ button. When a customer clicks on that button they will be redirected to your Shopify product page where they can purchase the product.
‘At this time, checkout is only available to customers in the US and a select number of businesses.’
‘At this time, checkout is in closed beta. For merchants who would like to be notified when checkout becomes available to a wider audience: Submit your contact information at the Checkout interest form here.’
Source: Instagram
10 things you should know about Instagram product tagging (August 2019)
- You can tag up to 5 products in single-image posts and video posts.

Source: Instagram
- You can tag up to 20 products in image carousels. Instagram image carousels consist of up to 10 images.
- You can add 1 product sticker per story. The product stickers are customizable - you can change their color and text.

Source: Instagram
- You can tag products only in image story posts, not video story posts.
- You cannot tag both people and products in the same posts or stories.
- You can tag products only in organic posts or stories (i.e. not promoted).
- If you delete a product from the Facebook catalog that is associated with your Instagram business profile, its product tag will be removed from all images the product has been tagged in. You will also lose insights for the associated tag.
- If you switch the Facebook catalog that is associated with your Instagram business profile, the product tags you have created will not be removed or changed.
- If a product is out of stock, its product tag will be removed from all photos the product has been tagged in. The product tags will not reappear automatically when the product is in stock again.
- ‘When you tag a product on Instagram that has more than one variant in Shopify, you need to choose a variant for the product tag.’

Source: Shopify
How to level up your Instagram marketing (Bonus Marketing Tip)
Now that you’re eligible for Instagram product tagging, it’s time to start thinking about how you’re going to leverage the power of Instagram.
Instagram ads and promoted posts may be out of the picture when it comes to product tagging, but this does not mean that you cannot use organic posts to boost your sales.
Here are 3 things you can start doing today that will be worth their weight in gold in the future:
1. Create a beautiful and engaging Instagram feed.
Don’t use Instagram solely for the purpose of showcasing your products. Instead, upload photos of your team laughing or having lunch, or photos of the cool corners of your office. Create screenshots of your happy customers’ reviews and share them on Instagram. Commemorate your 1st, 10th, or 10,000th sale with a photo of champagne glasses. Encourage UGC and share awesome photos of your products being used. Oh, and tag your products in these photos.
2. Write inspiring captions.
Be genuine, funny, bold, and inspiring… be human and be passionate about what you do. To paraphrase Brian Dean (the founder of Backlinko): Write like your Instagram audience talks. For more information, check Brian’s copywriting guide.
Be different from all the other brands whose goal is to simply make more sales. Remember that people are emotional beings - they tend to trust the brands that speak to them. These are the brands they relate to and want to spend their money on.
Note: For more tips on copywrighting, check this Complete Copywriting Guide by TakeFunnels.
3. Be active and be consistent.
What does it mean to be active on Instagram? Well, it depends on your business and your Instagram audience.
If you sell women’s apparel and accessories, for example, you can post every day. You can upload product photos, UGC photos (you’ll have many of those!), inspiring quotes, etc. In general, women love this type of content. Therefore, they won’t mind seeing it on their Instagram feeds on a daily basis.
But if you sell fishing equipment, for example, it might be a better idea to post every other day, because your target audience is less likely to like or comment on your posts as often. Therefore, you can aim for 2 or 3 posts a week.
However, regardless of your industry, we advise you to do a ton of testing and see what works best for your customers. Try posting every day. If people engage with your content, post several times a day. If you realize that a post a day is too much for your audience, update your Instagram feed every other day.
As far as consistency goes, things are much simpler. If you post one time a day, post every day at the same time. If you post once a week, post every week on the same day and at the same time. You get the idea!
These three simple things will help you build a strong and memorable Instagram presence which will refer more traffic to your website. And we all know what this means: more traffic = more sales opportunities!
Well, this is all from us for today!
Now, we'd like to hear from you:
- What specific challenges did you face with enabling Instagram product tagging?
- Did you find our guide and marketing tips helpful?
- Do you have further questions, remarks, or suggestions?
Feel free to share your thoughts in the comments section!



Hi, Dalilah!
I’m sorry to hear that you have been denied for Instagram product tagging! Thank you for the questions! I hope some of the following information will be of use:
1. To my knowledge, you don’t have to create a new account – you can resubmit the same Instagram account for approval. Here’s what I found on the matter:
“Steps to Take if Disapproved:
- Appeal the Decision
- If an item you posted has been rejected for violating our Commerce Policies, you can appeal and we’ll take another look."
You can check Facebook and Instagram’s Commerce Policy for more information: https://www.facebook.com/policies/commerce#
2. No, I don’t think you have to delete your entire Facebook page. Just make sure that it doesn’t have any age or country restrictions and make sure that your Facebook Shop section does not offer a “Message to Buy” checkout method. Your Facebook Shop must offer the “Check Out on Another Website” checkout method (because Instagram does not support the “Message to Buy” checkout method). So, if you have already created a Facebook Shop with a ‘Message to Buy’ checkout option, it would be best to delete the shop section, recreate it and select the ‘Check Out on Another Website’ checkout method. I found a link that might be helpful as it provides more in-depth information about the Facebook Shop section: https://www.facebook.com/business/help/238403573454149
Also, keep in mind that Instagram product tagging is currently available only to businesses that offer physical goods. Services and digital products are not accepted.
You can also check if your Facebook catalog is properly associated with your Instagram business account through your Facebook page (and that your Facebook page is the owner of the Facebook catalog you want to associate with Instagram). You can check Step #8 for more information
Good luck! And, please, let us know if you have any other issues when it comes to Instagram product tagging!
Regards,
Radostina
Hello! I am one of the people who have already been denied. I’m trying everything to get approval. I was wondering if you have an insight on the following:
1. If my shop has already been denied approval, can I resubmit for review on the same IG account? Or do I have to start fresh from a new account?
2. Do I only have to delete the Facebook shop, and create a new one, or do I have to create an all new Facebook page?
3. Would it be best to start with an all new Shopify account/store?
Thank you for any feedback.